Friday, October 28, 2016

Spooky Spiders- pretzel,peanut butter and chocolate treats.


Spooky Spider treats are easy to make and delicious!!  Pretzels, peanut butter and chocolate is one of my favorite combinations!!  Full recipe is at the bottom of the post. 


Mix peanut butter, butter, vanilla and confectioners sugar in a bowl until stiff. Then use your hands to roll into small balls. flatten slightly, place on wax paper and chill about 30 min.
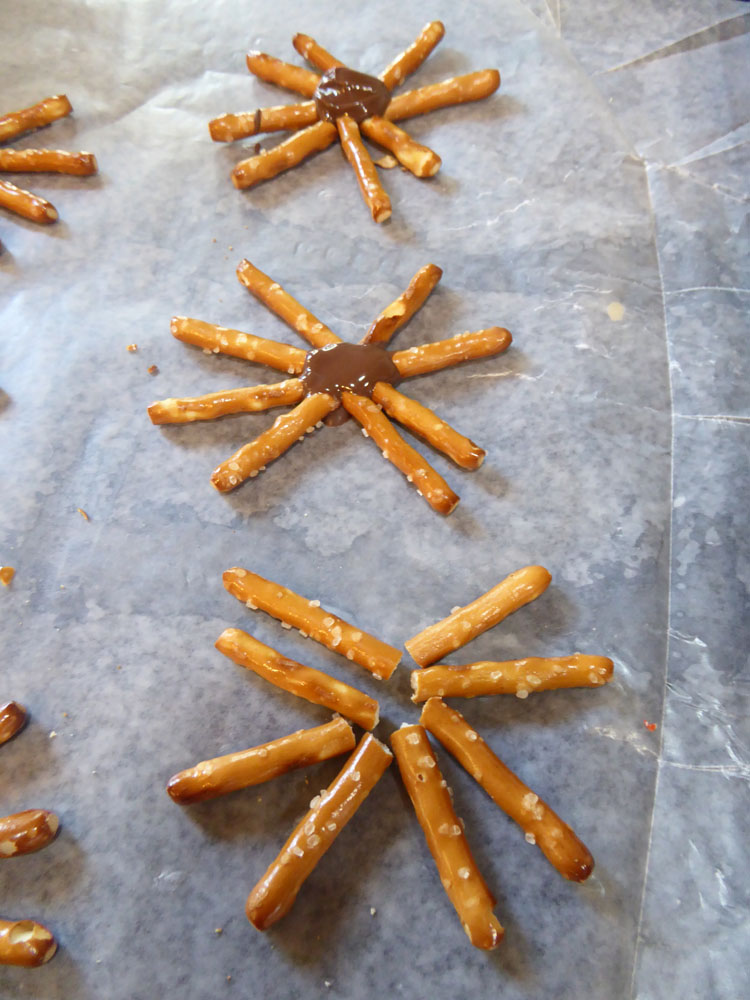

Using small pretzel sicks broken in half to make the legs. Arrange them on wax paper and then add a dollop of chocolate to hold them together.  


Once all of the legs are ready and the chocolate has hardened, dip the peanut butter balls in the chocolate one at a time and transfer to the pretzel legs using two forks. (see below)


This part is a little tricky and messy.  Lift the peanut butter ball out of the chocolate with one fork to allow the excess chocolate to drip off, then use the other fork to slide it off onto the pretzel legs. Use the fork to press down slightly to make sure it sticks to the chocolate on the legs. 


Allow the chocolate to harden before decorating. 


To decorate i used a little white chocolate in a pastry bag, icing would work too. Put a dot where you want your candy eyes to be and then press the candy into it. Then you can add other decorations like stripes, dots, fangs additional eyeballs. etc.  

These are a lot of fun to make, and the kids can help roll out the peanut butter balls, adding the eyes and decorating them.  


Spooky Spider Treats

Ingredients

3/4 cup smooth peanut butter
1/4 cup butter softened
1/2 teaspoon vanilla
2 cups confectioners sugar

bag of small pretzel sticks
1 1/2 cups semisweet chocolate chips 
1 tablespoons shortening
a little white chocolate or icing 
small candies for eyes.
wax paper

In a medium size bowl, mix peanut butter, butter, vanilla, and confectioners' sugar (mixture will be  really stiff). Shape into balls, flatten slightly and place on a pan covered with wax paper. Place into the refrigerator to chill for 30 min.
 When they are chilled. Use a double boiler or microwave safe bowl to melt the chocolate and shortening together. If microwaving heat in 30 sec. intervals and mix until smooth. 
To make a spider. Take 4 small pretzel sticks, break in half and arrange the 8 pieces on wax paper to look like spider legs. Add a little melted chocolate to the center of the legs to stick the legs together. 

Once hardened, dip the peanut butter ball into the chocolate to cover completely. Lift out with a fork and gently slide it onto the pretzel legs. Press slightly. Do this until all the spiders are complete. Allow chocolate to harden before decorating.  

Use a little icing or melted white chocolate to stick the candy eyes on, and decorate spiders as desired. 


Ripley's Believe it or Not: Unlock The Weird- Review.


All true, 100% ALL NEW, Ripley’s Believe It or Not!® Unlock the Weird! 2017 will amaze and astound readers from the first to the last page.  Hair-raising photographs, incredible stories, and the mind-blowing facts Ripley’s is famous for promise hours of entertainment for every Ripley fan! With thousands of stories—including submissions from readers around the world—you’ll discover something new each time you read it!


If your kids are anything like mine, then the recently released Ripley's Believe It or Not!: Unlock The Weird! would make the perfect gift!                                                             There are around 250, full color pages of weird and interesting facts! Both of my kids can spend hours reading the Ripley's books. My son will memorize the weird facts and then randomly share them when we are in the car. His brain is like an encyclopedia of weird facts and trivia. :)  He really loves this stuff.
i received this book in exchange for my review, then i'll be tucking it away to save for him for xmas.


Ripley Publishing has been releases an annual book showcasing the weirdest and strangest facts from around the world along with hundreds of colorful photos.  #UnlockTheWeird marks the 13th volume in the series. The book has been named a Mom's Choice Awards winner. 

Some of the photos are a little gross/gory so the recommended age is 10 and up.    The eye balls on the front cover look 3-D and pop right off the page. It's really a fun book!  Ripley's Believe It or Not! is globally renowned as the authority on the weird, the eccentric, and the amazing. Ripley's Believe It or Not! provides entertaining book which educates in a humorous style. The Ripley brand is known around the world as a trend-setting source of family-friendly fun and excitement! Every day the researchers at Ripley's are busy digging up the craziest true stories and the most unbelievable facts.

This large hardcover, full color book retails for $28.95 and can be purchased at Ripleys.com


i did receive this book at no cost in exchange for my honest and unbiased review. i only recommend products that we truly love and would use ourselves. 

Thursday, October 27, 2016

Garden update- End of October

i guess we have had what is called an Indian summer.  80 degrees at the beginning of October.  We've had a couple light frosts, but no hard killing frost yet, even though the average killing frost usually comes much earlier. 


So i haven't pulled my garden yet.  i'm still getting tomatoes, tomatillos, peppers and squash.  The peppers are suppose to be red, yellow and orange. They spent the first part of the summer stunted and then really took off when the weather began to cool off at night. Now the plants are loaded with big green peppers. They do this every year, i'm not sure why.


i love the variety of tomatoes i am still getting. Some from the greenhouse, and some from the garden.


This is my first time growing lemon squash, but it's a new favorite. It's very prolific and appears to be disease/insect resistant. The light frost damaged the upper leaves, but it's still producing these lemon shaped summer squash. Lemon squash is named for the shape, not the flavor. It can be used just like zucchini or yellow straight neck/ crooked neck squash. 


i've been eagerly waiting for my Striped Roman to ripen. Unfortunately before they had the chance they all started getting spots. i believe this is bacterial spot or speck. i think the tomatoes will still be edible once they ripen i'll just have to remove the skin. i don't know if the spots go deeper or are just surface. A bit of a bummer though, as these are really cool looking tomatoes. 


The tomatoes in mygreenhouse have been doing amazing. They are 10 feet tall and still loaded with tomatoes. However, i've started to notice brown mold on the backs of some of the leaves. This is tomato leaf mold, and it's primarily a greenhouse problem. i've been trying to remove the infected leaves, thin out my tomato plants to improve the circulation and running  fan. That's about all i can do right now. Hoping i'm able to sterilize the greenhouse at the end of the season, so it's not a problem next year.


i have a bunch of fall crops; lettuce, chard and kale started inthe greenhouse. i've been waiting for rain so i can plant it outside, but am starting to think i may keep it in the green house all winter to see how it does.  The greenhouse has been an experiment this year, and it has really gone well except for tomato mold and powdery mildew problems which are caused by the high humidity. i'm hoping next year i can figure out better ways to regulate the humidity.  i do have a humidity gauge set up, and i use the vents and fan when the humidity gets too high.  It's still a bit of a struggle though.

Still really pleased with the amount of food i was able grow in it this year, and am already planning out way to improve the gardens next year. i'm excited to get a head start with my seeds this spring. i can actually start them in February, and have the space to start everything which i've never been able to do before. i'm hoping to continue some cold crop gardening all winter long. My greenhouse is not heated though, so we'll see how it goes. i'm feeling really good about this years harvest though. My pantry is stocked full of home canned foods, sweet potatoes, potatoes and root veggies.

Sunday, October 23, 2016

Live Infinitely product review- Live without limits


i'm super excited to be working with Live Infinitely again to review their double hammock in PURPLE!
Live Infinitely began when a young couple from small hometowns decided to take their passion for fitness and the outdoors and share it with others. They are not some big corporation where customers become numbers stored in a filing cabinet. They recognize names, look forward to emails and get excited when they see their products selling in new states. If you contact them, they will respond to your questions, suggestions or concerns within 24 hours ALWAYS!


Kenan and i both enjoy testing out the new double camping hammock. It's made from durable weather resistant, quick drying 210T Parachute Nylon with all weight bearing seams and TRIPLE stitched so it's strong!  It comes with Poly-Filament Webbed Tree Straps, that are triple stitched and have the loops sewn in, so there is no need for tying. They are totally fail proof and so easy to use. They come with their own nylon carrying cinch bag. The double hammock is huge, it fits two adults comfortably. It's guaranteed to hold 450 lbs It measures 9' 10" long by 6' 6" wide.


Kenan has a #liveinfinitely double hammock in blue/grey and i'm saving the purple one for my son who is ready for his own. Besides using it when we are hiking/camping. Apparently 'mocking is a thing now.  Mocking' is when teens get together and hang out in hammocks for hours at a time talking, reading, texting and playing on their on phones.


The entire hammock packs up into an attached pouch measuring 6"x 8" and only weighs 18 ounces. You can truly take this anywhere!  

The Double camping hammock by #liveinfinitely is really strong and durable. Set up and take down is really quick, so it is perfect to take hiking, camping and use at festivals. The hammock is made from weather resistant nylon. It is quick drying, mildew resistant and machine washable.  They are backed with a 100% satisfaction guarantee. 


Live infinitely not only offers high quailty hammocks, they also sell Infuser water bottles, Exercise balls, resistance straps, hammock hanging kits and more.  When buying from Live Infinitely you not only experience the relief of receiving a quality product that will not need replacing but you also eliminate the frustrations of purchasing online. 

Their reputation for quality and care for their customers has given them many repeat costumers and great recommendations.  They are definitely doing something right!
  
  i received this hammock free in exchange for my review, but all opinions stated in the review are my own and were not influenced by the sponsor.  i was not compensated for my review or opinion and only review products that i would actually use myself and feel good about recommending.  We LOVE our Live Infinitely hammock!


Tuesday, October 18, 2016

Olive Egger Mystery

You may remember earlier this spring when we ended up with a bunch of new chicks.  i was trying to hatch out olive eggers. Olive Egger chickens are not an actual breed, but a cross of two breeds — usually a blue egg layer and a dark brown egg layer. For example, when an Ameraucana hen's egg is fertilized by a Marans rooster, the resulting chick will be an Olive Egger who will lay olive green eggs. i only have one olive egg hen, and i've been trying to breed her with my Black copper Maran rooster, so that the female chicks would then lay dark olive eggs. When i tried this last year, i end up hatching out all roosters.  This year, i tried again, but the olive eggs kept disappearing or breaking.

Then my wild hens began disappearing and returning with chicks. We had to give away a bunch of them. i bet those crazy hens hatched out 60+ chicks. It was so frustrating, because i really didn't need any more chickens, i just wanted to have a couple more olive eggers.  Many of the new chicks look just like my other wild/gamey birds. A few have the same striped look of my Olive egger hen, leading me to believe one of the Olive egg roosters may have fathered them. 


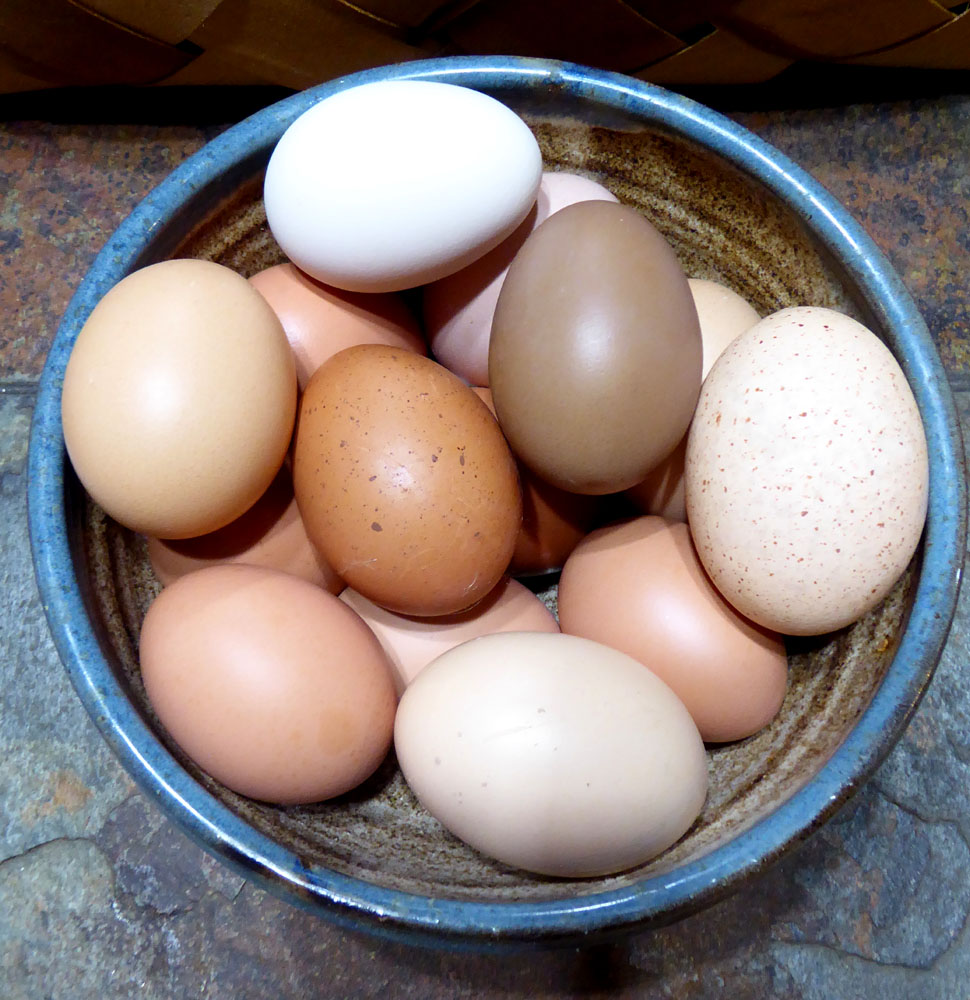
 i was under the impression that the roosters wouldn't carry the olive egg gene to pass on to their chicks, so imagine my surprise when a couple of my spring chicks started laying and i got an OLIVE EGG! It's a really dark olive too.  All three of these eggs came from chicks from that first clutch of 16.  There are two large fluffy gray hens in that batch that looks more like domestic hens than the wild girls. One has started laying the brown eggs that are just a shade or two lighter than my maran eggs, and the other is laying the olive eggs.  The bright white egg came from one of the wild girls, even though they typically lay an off white cream. 


My egg color variety is really fun right now. My marans are currently molting, but when they start laying again they lay the chocolate brown eggs. My original olive egger, Olive lays olive eggs like the one above but much larger and maybe just a hair lighter.


This is my beautiful mystery hen that is laying the olive eggs. i named her Gracie. She is such a gorgeous and unusual looking hen. My wild hen hatched her out, and she wasn't sitting on any green eggs...so i have no idea what Gracie  is a mix of.  Here, i've been trying to hatch out the green/olive eggs to get an olive egger and i get one without even trying. With the amount of wild birds we hatched out, i have to think she's probably not the only one. Although she is the only one with this look.  


In all my efforts to actually hatch out an Olive egger from an olive egg, i only ended with two chicks. As they grew i was pretty excited, because i was certain that both were girls. Then one morning i found one of them dead in the coop.  i believe my Maran rooster who is quite large may have crushed her, as they were fully feathered but still tried to climb under the other birds like they did with their mama. That left me with one Olive egger. This girl.  She is not laying yet, but when she does she should lay dark olive eggs. Even darker than the ones i'm already getting. She is a mix of Olive Egger ( americana/maran) and Black Copper Maran.  So i'm really excited for her to lay, although it probably won't be until the spring.

i've been trying to thin out my flock and give away as many of the new birds as i could, but now i feel like i need to wait until spring to see who may be laying olive eggs. One of the main things i had wanted to do it get the green gene introduced into my flock, so i wasn't dependent on my one olive egger for green eggs. If something happened to her, i would no longer have olive eggs and Olive eggers are difficult to find. However, Gracie has proved that i don't have to hatch them out of olive eggs, the roosters must also carry the gene.  So i really think i've succeeded in that. i can't wait to see what other egg colors we end up with.