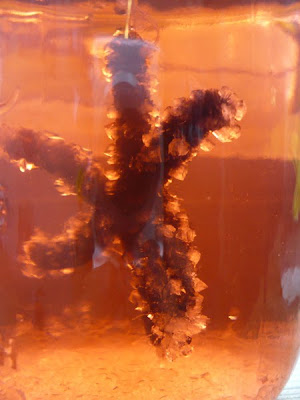
The first thing you need to do is boil your water. We used about two cups of water per pint jar. While the water is boiling, you can make a shape out of your pipe cleaner. It needs to be able to fit in the jar without touching the sides or bottom.
 Tie the string to the pipe cleaner, and tie the other end of the string to the pencil. The pencil sits on top of the jar and holds the pipe cleaner suspended above the bottom of the jar. Once you have your pipe cleaner shapes the correct size/length, set them aside.

 Hang the pipe cleaner shape into the jar so that the pencil rests on top of the jar and the shape is completely covered with liquid and hangs freely (not touching the bottom of the jar). Within minutes, we could see the borax beginning to collect on the pipe cleaners.


*taken from http://britton.disted.camosun.bc.ca/snow/boraxsnowflake.html
The Science Behind the Fun
Borax is an example of crystal - "a solid with flat sides and a symmetrical shape because its molecules are arranged in a unique, repeating pattern."Every crystal has a repeating pattern based on it's unique shape. They may be big or little, but they all have the same "shape". Salt, sugar, and Epsom salts are all examples of crystals. Salt crystals are always cube-shaped while snow crystals form a six-sided structure.
How do the Borax crystals grow?
Hot water holds more borax crystals than cold water. That's because heated water molecules move farther apart, making room for more of the borax crystals to dissolve. When no more of the solution can be dissolved, you have reached saturation. As this solution cools, the water molecules move closer together again. Now there's less room for the solution to hold onto as much of the dissolved borax. Crystals begin to form and build on one another as the water lets go of the excess and evaporates.
This also applies to snowflakes - As water cools the molecules move closer together. Since all water molecules are shaped the same (H2O) they align in a six sided crystal.

Thanks!!! We're homeschooling this year and this will be great for the kids!
ReplyDeleteLOVE this!!
ReplyDeleteawesome! I used to do this as snowflakes with my grade 4 science class. Love the different shapes and the colouring. I'll have to do it again with my own kids.
ReplyDeletethanks for sharing and commenting on my blog.
I Love these! I've tried this before, but you have inspired me to do this again! I probably have the materials too. Love you blog!
ReplyDeleteI love this I will have to dot his with my son this week.
ReplyDeleteNeat! I was just blog hopping & came across your blog & clicked on this because it looks so fun & pretty. I wrote down the directions. My art-crazy 6 yr old will love it.
ReplyDelete:)
This is awesome and I will try it with my Grandchildren !!!! Thanks for the great idea !!!
ReplyDeleteI think I'm going to try this with my girl scout troop for mother's day gifts!
ReplyDeleteThanks for the great idea!