Showing posts with label food. Show all posts

Friday, September 13, 2019

Cooking with Chicken of the Woods- Laetiporus sulphureus


Laetiporus sulphureus, are commonly known as sulphur shelf, chicken of the woods, the chicken mushroom, or the chicken fungus because many think they taste like chicken.  As a vegetarian, i can't say i really remember what chicken taste like, but it has a texture that is similar to chicken making it really versatile and easy to use as a replacement in any chicken recipe.


This year we've really been enjoying it. We have found 4 large chicken of the woods harvests so far, and are still watching a couple logs that usually fruit. We picked way more than we could eat at one time, so we froze a ton of it.  The easiest way to preserve chicken of the woods is to freeze it.  Some folks cook it first and others just clean it and put it right in the freezer.  i wasn't sure of which way would work the best, (having never froze it before) so i froze some raw and froze some cooked (cut up strips and sauteed in butter).  Once we have a chance to use it, i'll have a better idea of which method i prefer.

While we had fresh Chicken of the Woods on hand, we feasted on it every day!  Below are a few of my favorite ways to eat it.


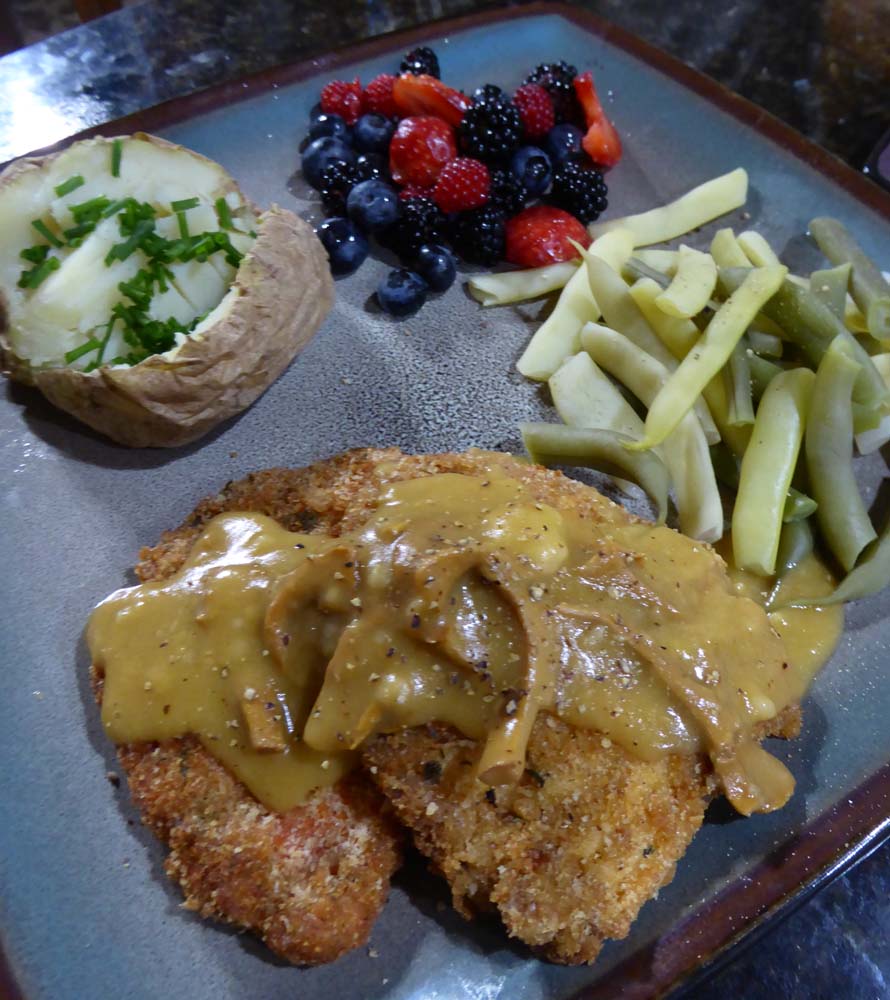
'Chicken' fried Steak with mushroom gravy.  This is really just chicken of the woods breaded and fried and covered in gravy.  My kids prefers to dip it in ketchup like nuggets, but the husband and i enjoy it like this.  i served it with homegrown beans, potatoes and fresh picked berries.

Basic recipe-  Clean the chicken of the woods by brushing it off and lightly wash it if needed and cut off any bad/tough spots.  Dip in seasoned flour, then dip in egg wash (egg beaten with a little water) then dip in seasoned breadcrumbs.  Fry both sides until golden brown. Transfer to plates and top with mushroom gravy. 

Mushroom gravy-  
2 1/2 TBSP butter, 
1 cup fresh mushrooms  (i used a combination of oysters, black trumpets, chanterelles and shiitake)
 1/4 cup flour
1 1/2 cups vegetable broth
2 tbsp Tamari 
pepper.

Melt butter in small saucepan over medium-low heat. Add mushrooms and cook until soft. Add flour and mix about 30 seconds; then add broth slowly while whisking. Cook over medium heat for 2 minutes. Add tamari and pepper to taste. Cook until gravy achieves desired thickness


We enjoyed a lot of the Chicken of the woods breaded and fried, and then i had the idea to stuff it.
OMGoodness it is so good. i don't have an actual recipe for this, but it's easy enough to do. 


 i cooked some spinach, drained it well and mixed with mozzarella and feta.  Took two pieces of super fresh chicken of the woods that had been trimmed to similar sizes. put a scoop of the mix on one piece, add sliced tomato and then topped with the other piece.

Once i had a few of these sandwiched Chickens together, i breaded and fried them like above.  Dip each 'sandwich' in seasoned flour, then dip in egg wash (egg beaten with a little water) then dip in seasoned breadcrumbs.  Fry both sides until golden brown and transfer into a baking/casserole dish. Once the dish was filled up, i covered it with tin foil and baked it about 20 min. at 385f.  i did this to make sure the chicken of the woods cooked all the way through and the cheese was melty.  This is probably one of my favorite ways to eat it, but it is a bit time consuming to make.


For lunch, i made 'Chicken' salad sandwiches. i diced up the Chicken of the woods mushroom and simmered it in vegetable broth until it was super tender and had absorbed much of the broth.  From there you can use it  just like chicken in your favorite chicken salad recipe. Having never really made chicken salad before, i just added diced onion, diced swiss chard stems (i don't like celery), mayo a little mustard and salt and pepper. Served it on a bun with homegrown lettuce and tomato.  Fresh cucumber, carrots and peaches from the garden.


Another favorite  (and quick) way to prepare it is as BBQ sandwiches. If your Chicken of the woods is really fresh, it will shred just like chicken. If it's dry and crumbling you may want to cut it into slices and simmer it in some broth until it softens up.  i take my freshly shredded Chicken of the woods and add to a pan with a little olive oil, cook over medium heat until it starts browning a bit and then add your favorite BBQ sauce.  Serve on a toasted bun with caramelized onions and cheese. 

There are a ton of recipes out there for Chicken of the woods,it really is super versatile. It's a very firm mushroom and doesn't really get slimy like many other mushrooms do.  Besides the recipes above, i've used it to make 'chicken' pot pie, 'chicken' quesadillas, Fried 'chicken'  more! 

Do you have a favorite Chicken of the Woods recipe? i'd love to hear it! 


Thursday, May 18, 2017

What's Growing? Garden News- First Week of May

Garden season has officially started. My last possible frost date was Mother's Day weekend. i have a lot of crops that were planted very early in the spring that are ready for harvest, and my summer crops have almost all been started in the green house so i haven't been in a huge hurry to get them into the ground.


At the end of April, first week of May my lettuce was really starting to come in. i have it planted both outside and in the greenhouse, so once the greenhouse lettuce is gone, the lettuce in the garden should be ready. 


i have many different varieties of lettuce. They grew really well in the greenhouse in the early spring, but it's starting to get a bit too hot for them now. They haven't bittered yet, but with the rising temperatures they will be soon.  i have the vents open, but really need to set the fan back up to keep the air circulated and temperatures below 100.


Blueberries are looking good this year. i have a couple bushes again this year, with no berries on them, but the majority of bushes are totally loaded. i ran out of blueberries (freezer) a few weeks ago and i'm eager to fill my freezer back up with them. We love having a freezer full of blueberries to use in muffins, pancakes and cakes. i don't think we could ever have too many blueberries.


i planted about a dozen broccoli this year, but may have planted it too early again. Several have buttoned and the rest look a bit stunted. i think this is from the temps being 80 degrees one week, then 16 degrees the next. Broccoli usually does better in the fall, but i always try it in the spring anyhow. 


Outside under row covers i have lots of spring mix leaf lettuce and spinach is coming in well.  Spinach really prefers the cool weather so i'm expecting it to start bolting soon. i have more planted in a more shaded area, so i'm hoping it keeps producing a while longer.  


So far it's been a good spring. Still getting asparagus and eggs, and lots of leafy greens.

This week i'll working on getting my garden planted. Almost everything was started in the greenhouse and had a good head start. i actually haven't done any garden planning so i really need to sit down and figure out where i'm going to put everything.  We moved the potatoes this year into a different garden, so i lost that garden space. We are trying corn in the old potato bed, and i'll be able to put some squash and beans in there as well, but that doesn't leave anywhere for tomatoes.  So i need to check last years garden plan so i know the best way to rotate things this year.

Looking forward to a good gardening season! i'm planting several new varieties i can't wait to check out! What's coming up in your garden?

Thursday, October 27, 2016

Garden update- End of October

i guess we have had what is called an Indian summer.  80 degrees at the beginning of October.  We've had a couple light frosts, but no hard killing frost yet, even though the average killing frost usually comes much earlier. 


So i haven't pulled my garden yet.  i'm still getting tomatoes, tomatillos, peppers and squash.  The peppers are suppose to be red, yellow and orange. They spent the first part of the summer stunted and then really took off when the weather began to cool off at night. Now the plants are loaded with big green peppers. They do this every year, i'm not sure why.


i love the variety of tomatoes i am still getting. Some from the greenhouse, and some from the garden.


This is my first time growing lemon squash, but it's a new favorite. It's very prolific and appears to be disease/insect resistant. The light frost damaged the upper leaves, but it's still producing these lemon shaped summer squash. Lemon squash is named for the shape, not the flavor. It can be used just like zucchini or yellow straight neck/ crooked neck squash. 


i've been eagerly waiting for my Striped Roman to ripen. Unfortunately before they had the chance they all started getting spots. i believe this is bacterial spot or speck. i think the tomatoes will still be edible once they ripen i'll just have to remove the skin. i don't know if the spots go deeper or are just surface. A bit of a bummer though, as these are really cool looking tomatoes. 


The tomatoes in mygreenhouse have been doing amazing. They are 10 feet tall and still loaded with tomatoes. However, i've started to notice brown mold on the backs of some of the leaves. This is tomato leaf mold, and it's primarily a greenhouse problem. i've been trying to remove the infected leaves, thin out my tomato plants to improve the circulation and running  fan. That's about all i can do right now. Hoping i'm able to sterilize the greenhouse at the end of the season, so it's not a problem next year.


i have a bunch of fall crops; lettuce, chard and kale started inthe greenhouse. i've been waiting for rain so i can plant it outside, but am starting to think i may keep it in the green house all winter to see how it does.  The greenhouse has been an experiment this year, and it has really gone well except for tomato mold and powdery mildew problems which are caused by the high humidity. i'm hoping next year i can figure out better ways to regulate the humidity.  i do have a humidity gauge set up, and i use the vents and fan when the humidity gets too high.  It's still a bit of a struggle though.

Still really pleased with the amount of food i was able grow in it this year, and am already planning out way to improve the gardens next year. i'm excited to get a head start with my seeds this spring. i can actually start them in February, and have the space to start everything which i've never been able to do before. i'm hoping to continue some cold crop gardening all winter long. My greenhouse is not heated though, so we'll see how it goes. i'm feeling really good about this years harvest though. My pantry is stocked full of home canned foods, sweet potatoes, potatoes and root veggies.

Saturday, October 15, 2016

Crust-less Mini Quiche with freshly ground salt and pepper - Spice mill review


Mini-quiche are my new favorite thing. They are so easy to make and delicious. If you have a silicone cupcake pan, they don't stick AT ALL! So clean up is super easy.  


i intended to take pictures of all the steps in the process, but totally failed to do it, but i had already taken a few pictures of my mini-quiche so i thought i could still put together a post. They truly are so easy you don't need the step by step pictures.  The main ingredients you need for these are eggs, cream or milk, cheese, seasoning, a muffin pan and whatever else you want to add.


Lightly spray your muffin pan with oil. Then in a medium size bowl, use a fork to mix your eggs and cream.  Then stir in the cheese and other ingredients. i used a measuring cup to fill each cavity with the egg mixture, then seasoned it with freshly ground salt and pepper.  
My new salt and pepper grinders are by #Dailykitchen.  They are really nice large glass spice mill shakers with the grinders built into the lid. The stainless steel matches my appliances, and they are so easy to use. My mom is going to be thrilled, it's been almost 4 years since our housefire, and i finally have salt and pepper shakers again.  :) lol.  


Once your cups are filled, bake at 350 for approx. 20 minutes. Check with a toothpick in center to make sure they are done.


Let them cool slightly, then pop them out. they are so good.


Spinach mushroom mini-quiche


4 eggs Large eggs
1/2  shredded mozzarella 
1/2 cup feta
A little olive oil (for cooking the mushrooms) 
1 cup fresh spinach 
1/2 - 1 cup chopped mushrooms
1 medium tomato diced (optional)
1-2 Tbsp, heavy cream or milk
fresh basil shredded (optional)
Freshly ground Salt and Pepper, to taste


heat the oil in a skillet, and add sliced mushrooms and cook until tender 4-5 min. Add fresh spinach and cook until wilted. Remove from heat and set aside. In a medium mixing bowl, whisk the eggs and cream until combined. Add the cooked mushroom/ spinach mixture, the cheeses, fresh tomato and basil/ Mix well. Use a measureing cup to scoop mixture into lightly oiled silicone muffin pan. Add freshly ground salt and pepper to taste. 
Bake for at 350 for around 20 min. or until tooth pick stuck in center comes out clean. 
Recipe makes 12 mini-quiche.


*i received the Spice Mill salt and pepper shakers in exchange for my honest review. i was not compensated. i felt that incorporating them into a recipe and showing them in use was the best way to test them out for my review. i'm very pleased with these shakers, and really love they way they match my kitchen. i was not compensated for this post.

Thursday, June 16, 2016

Greenhouse Update

i am absolutely loving my greenhouse! It's all still a bit of an experiment for me. i keep the tops vents open and door opened with my screen during the day to try and keep the temperatures from getting too hot. i may eventually have to put a fan in it though, i had a couple days last week where the temperatures reached 109.  


Kenan build a large raised bed along one of the walls. i planted a rainbow of tomatoes, peppers, eggplants, carrots and lettuce so far. i also have some Malabar spinach planted and a couple cucumbers. Some of the veggies will have to be hand pollinated, but the tomatoes, peppers and eggplants i believe are self pollinating. i'm hoping that by spraying them with the hose, it shakes them around enough to pollinate.  The tomatoes have tomatoes on them, and i also have one eggplant so it does seem to be working so far.


So, i wasn't going to over plant tomatoes again...but somehow i did. :) Besides the tomatoes already planted in the garden, i also have over 100 seedlings and potted tomatoes in the greenhouse. i'm still finding places to put them all. i've been able to start so many things in the greenhouse, that i just didn't have room for before.  


Tomatoes and eggplants.  i'll be transferring them into larger pots soon. i plan to keep the eggplants in the greenhouse, they have never done well in the garden. The flea beetles just destroy them. So far they are doing great in the greenhouse! Flowering and producing eggplants! 


Wohoo! baby eggplant!!


So far my tomatoes are doing great in the greenhouse.  They are a little lanky, but overall they look good!


i have lots of seed trays started. i started all my lettuces, beans, flowers everything in the greenhouse, so i haven't been in a huge hurry to put them in the garden. We finally got some rain last night though, so i will be moving a tons of plants outside today.

i'm really hoping that the greenhouse will help expand my season and allow me to increase my production, by actually having a few disease free plants.  i was a bit worried the heat would cause my lettuce to bitter, but that hasn't been the case so far.

So despite my rather laid back approach to the garden this year, i really feel like it's doing fine.  i just need to get out there today while the soil is still damp and finish getting plants in the ground.

Sunday, June 12, 2016

What to do with Garlic Scapes? Pesto recipe.


It's garlic scape season!! What's a garlic scape? Garlic scapes are the flower bud of the garlic plant. The bud is removed to encourage the bulbs to thicken up.  Scapes taste just like mild garlic. They can be used in exactly the same way as garlic in any recipe.


When scapes first appear they are curled.  i pick them at this stage, if you wait too long they uncurl and flower. They are too tough to pick at that point and are not good to eat. Every year i let a couple of my garlic plants flower and go to seed, so i have several patches of garlic i grow primarily just for the scapes.  when you grow garlic from seed or bulbils it takes several years for the garlic to be large enough to harvest. So i just harvest the scapes, the first couple years until the garlic is larger enough to harvest.


So what can you do with garlic scapes? The easiest thing is just to saute them in butter or olive oil. i also have asparagus ready to harvest, so i often saute them together into a stirfry. Sometimes i add broccoli or sugar snaps if i have any ready to pick.


Garlic scapes are also fabulous on pizza!! i saute them first, then add them with the other toppings and bake.  So delicious. 


Just like asparagus, scapes are great with eggs. i like to use them in quiche, frittatas, and omelets. i always cook them first, sauteing until tender before adding them to the dish. 


This year i have such a great scape harvest that i decided to make garlic scape pesto. It's incredibly easy to make and absolutely delicious!  i then used the pesto as sauce on pizza topped with homemade mozzarella, feta, asparagus, spinach and more garlic scapes.

i also use the pesto on cheese ravioli and fettuccine.

  1. For the pesto
    • around 10 large garlic scapes (small handful)
    • 1/3 cup pine nuts
    • 1/3 cup finely grated Parmesan cheese 
    •  salt and black pepper
    • 1/3 cup extra-virgin olive oil
  2. Chop the garlic scapes, then add all ingredients except salt and pepper to your food processor or blender.  Blend/process until smooth, then season with salt and pepper to taste.  
Can be refrigerated for up to a week. 

Garlic scape pesto is so good on pasta! Do you have a favorite way to eat garlic scapes?  Let me know in the comments! 


Saturday, June 4, 2016

Garden Progress June 1st.

i can't believe it is already June!  i haven't started to completely panic about being behind, but i may start to pretty soon. i still don't have my garden completely in, but everything has been planted and is growing well in the greenhouse. So even though it's not in the garden, it's still planted and doing well. i just need to spend one day getting everything in the ground.

Kids are out of school for the summer, and we are starting off our summer vacation with one sick kid (fever and cough) and mama sick from the Doxy i'm taking for Lyme.  Good times!


Picked our first homegrown salad a few weeks ago. All of my cold crops are planted and doing great.   i've been picking lettuce, spinach, swiss chard, kale and asparagus for a few weeks now. Also a few small carrots and radishes.


Just this last week i started getting broccoli and garlic scapes too. i finally decided to use row covers this year and for the first time ever, i have beautiful worm-free organic broccoli! It's your trying to grow anything in the cabbage family, row covers are the way to go!! 


No worms, aphids or bugs of any kind! why did it take me so long to figure this out? lol.


i also have cabbage, cauliflower, purple sprouting broccoli and fractal broccoli all under row covers.  i also have one on some cucumber plants. i'm eager to see if i can actually grow cucumbers without getting sudden wilt from the cucumber beetles.


My peas took a beating when we had a hail storm back in April, so i had to replant most of them and they are finally starting to bloom. i planted regular sugar snaps, and also these Blush tendril snap peas from Baker's Creek. The blossoms are so pretty, and they climb like crazy. The pea pods are supposed to be blushed with pink as well.  i hope that they are as sweet and tasty as sugar snaps. 


Eggplants are doing fantastic in the greenhouse.  They never seem to do very well in the garden. Flea beetles tend to eat the leaves and then they end up somewhat stunted and never really recover.  The last couple years i've succesfully grown them in pots, so this year i planted a bunch in pots and plan to keep them safe in the greenhouse, moving them outside occasionally if it's too hot inside.


This year i totally over planted tomatoes again. i have a bunch in the greenhouse, and a bunch in the garden...plus tons of starts just waiting to be repotted and planted.  Having a place to actually start seeds has been so wonderful.  Everytime i move plants out of the greenhouse i start more seeds. :) 

Growing in the greenhouse is a bit of an experiment this year. i'm not sire if it will get too warm for the plants to pollinate or if some will have to be hand pollinated...or if they won't work out at all. My husband built a larg raised bed inside the greenhouse and i have tomatoes, eggplant, peppers, carrots and lettuce planted in it. So far everything is doing great.  i'm able to vent the greenhouse, and with the magnetic screen door i can keep the doors open.  i already have lots of green tomatoes. My only challenge is keeping everything watered. The plants tend to dry out quickly, and i feel i'm constantly watering them.

We have the rainwater collection cistern set up for irrigation, but it really hasn't rained much this spring so i worry that i'm going to drain it by the amount of water i've been using.  

So far it all going well, and i'm trying to make a point of documenting it all so that next year i know what works and what doesn't.  i'm really hoping for a productive year though and feel like the greenhouse is really a benefit for my garden and homesteading path. 

Thursday, May 26, 2016

May the 4th Day & Star Wars icecube/candy molds- review


May 4th is known as the unofficial Star wars Holiday to Star Wars fans everywhere ! My post is a little behind, but this year we decided to make Star wars candy in celebrations of May the 4th.  


My family are huge star wars fans so we were very excited to review these Starwars silicone icecube trays/candy molds.    They are made of 100% high quality food grade silicone. They can be used in freezer, fridge, dishwasher and oven. They are heat resistance up to 450 Degrees Fahrenheit.

These can be used for so many things! You can use them to make Starwars shaped ice, chocolate, crayons, soap, jello jigglers and more!


The kids helped me test these out and we made a bunch of really cool chocolates!! The molds are very detailed.  The set comes with 6 molds. You get Darth Vader, Stormtroopers, X­wing fighters, the Millennium Falcon, R2-D2 and even Han Solo in Carbonite.  The R2-D2 mold and the Han Solo have two different sizes on the mold. 


The chocolates pop out of the molds really easily.  i've made candies using regular chocolate molds before and sometimes the chocolates stick and don't release well. The neat thing about the silicone molds and is that you can actually turn them inside out to pop the chocolate out.


After adding your chocolate, you really want to gently tap the trays down a few times.  These should have had much more details, but i forgot to tap them so there some bubbles in them.  Also, when removing the R2-D2 you really want to pay special attention to the feet. The first one i popped right out and the feet broke, so when i removed the second one i did it a little more slowly and it came out perfect!


The Millennium Falcons turned out awesome!!  We filled these with toasted coconut, almonds and added some white chocolate on the backs.  


Just for fun, i used the Hans Solo mold for my fresh homemade butter. :)  i chilled the butter in the mold before attempting to pop it out, but it came out perfect.  

These molds clean up easily and are so much fun!! The Star Wars silicone #icecube tray molds are available here.

We received the molds for free in exchange for our review.  My opinions are my own. We really had fun with these, and i wouldn't recommend them if i didn't truly love them!