Wednesday, September 1, 2010

Favorite August-Sept Giveaways!


i'm trying to win my daughter the new Tinkerbell movie prize pack!!


Disney’s Tinker Bell and the Great Fairy Rescue | Prize Pack Giveaway

at A Happy Hippy Mom enter here! ends Sept 25

For another chance visit My organized Chaos. enter here ends Sept 24

and another chance at Thats It! Mommy. enter here ends Sept. 27th

And again at Keeper of the Cheerios enter here!! ends Sept 30th


I'm trying to win Six Flag tickets From No Time Mommy!!

You can enter here! 9/30


Wordless Wednesday- Monarchs emerging and release


To see more W.W. posts or to add your own visit Wordless Wednesday.

Tuesday, August 31, 2010

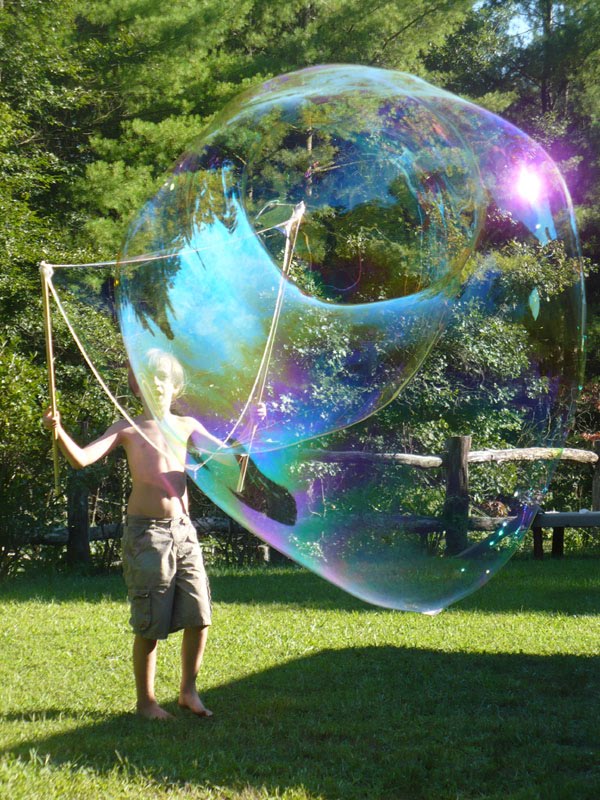
Giant Bubbles!

Have you ever seen those gigantic bubbles at shows or festivals and wondered how they were made? i recently came across a tutorial on The Childhood Magic website, and knew we had to make a giant bubble wand.


These are extremely easy to make, and so much fun! The kids have spent hours outside making bubbles. My boy is quite good at making some monstrously huge one, and my girl is extremely good at popping them. :)

i can give you a brief explanation on how they are made, and you can check the tuorial above for picture and more description if you need it. They are honestly very simple, and can be made with a few basic supplies.

You'll need 2 wooden dowels.
2 screw in eye hooks.
100% Cotton cord or yarn.
a metal washer or addition eye hook to use as a weight.

So all you do is screw an eye hooks into the end of each dowel. Then cut two pieces of the cotton cord, around 35" for the top piece, and 70 " for the bottom. i didn't actually measure mine, just guesstimated. You can really make them any size you like. You just want to make sure the bottom piece is twice as long as the top.
i could not find the cotton cord suggested in the original tutorial, but did have 100% cotton yard. i did a quick chain stitch to make a crocheted cotton cord and it worked fine. If you don't know how to crochet, you could braid the pieces so they are a bit thicker and heavier than a single piece of yarn.
Now tie the shorter piece of yarn to the eye hooks, connecting them and then slip the washer/eyehook/weight onto the longer piece and tie it to the eye hooks under the top cord.

That's it! Now dip it in your bubble solution ( We used dish soap and water) and have fun!!


i could take pictures of these all day! They are so much fun, and each one seems bigger and more amazing than the one before it.


It took my boy a little while to get the hang of it, but then once he got it he was a bubble making expert. We figured out that if you gently bring the ends of the wand together, it will cut off the bubbles. So you can make 3 or 4 giant bubbles that float away with just one dip in the bubble solution.


Miss Sage wasn't quite big enough to do these. i think our dowels were a bit too long. So i'm going to make another wand for her that has smaller dowels, and a bit less yarn so that she can make them too. She had just as much fun chasing and popping the bubbles.


i tried getting a picture looking through the giant bubbles as they are being created. This picture doesn't do justice, it really looks very cool as the bubble grows and grows. It even looks neat when they pop.

Check this link for some addition homemade bubble recipes.

If you like bubbles, you absolutely must try this! Happy bubble blowing!

Monday, August 30, 2010

Canning Grape Juice and Jelly.

So once again we have been blessed with free food from our extremely generous neighbors. They called a few days ago asking if we had any interest in grapes. Their grape vines were overflowing and they had already shared with friends and family and still had buckets of grapes to give away. Like the other fruits we have received from them, these have never been sprayed or treated and are totally organic.

Our neighbors had explained the way they can their grape juice, but i couldn't remember the exact recipe. So i started looking online for instructions and was thrilled to find the same recipe on The Backwoods Home site. This really is an extremely easy way to make grape juice for canning. Keep in mind, it makes a grape juice concentrate, with sugar added so it's not 100% juice. The recipe calls for 1 cup grapes, 1 cup sugar and enough boiling water to fill your quart jar.

First, make sure you wash and sterilize your quart jars in a water bath canner for 10 min. Then add 1 cup grapes( washed and stems removed), and 1 cup sugar. Fill the jars with boiling water, leaving 1/2" headspace. Wipe jar tops with a clean damp cloth, apply clean lids and rings, and screw on fairly tightly.


The original instructions say not to bother mixing, as they will mix while processing. i found from my first batch that they didn't really mix, and there was a layer of undissolved sugar on the bottom of the jars. So with the rest of my batches, i screwed the lids on and then mix them up by turning the jars upside down a few times to make sure all the sugar dissolves before processing.

Process for 25 minutes, a bit more if your in a high elevation. That's it! Super quick and easy.


Here is an example of the finished product ( on the right) that's grape jelly on the left. The longer you let it sit, the stronger the concentrate becomes. You dilute it with water to serve, 1/2 to 1 jar water depending on taste. This same method can be done to make cherry juice, though i am not sure about other fruits.

i also made a batch of grape jelly, although i don't have a tutorial for it. i just used the directions that came with the fruit pectin. i didn't even squeeze the grapes by hand...i used my juicer. So it was very, very simple, boil the juice and add a crap load of sugar and pectin, boil again and fill jars. Easy peasy. :) i plan to make another batch today, after i start in on these pears.

It is going to be another busy week here as i work on canning and freezing apples, pears, peaches, tomatoes and grapes. i feel like a little squirrel gathering nuts for the winter. It's a pretty good feeling though, looking around at my packed deep freezer, and shelves of home canned goods and knowing where it all came from.

Once the cold weather moves in and the garden begins to die back i promise to get back to crafting. i have so many ideas floating around in my head, just need the time to do them. My focus for the Autumn is dolls, mainly waldorf style, felt and crocheted play foods and new bead work.
Anything else you'd like to see again?


Saturday, August 28, 2010

Afternoon hike

Yesterday we took a small hike down to road to see if there were any remaining monarch caterpillars on the milkweed patch. i noticed earlier this week that the milkweed in that area is beginning to yellow and die back.

i was surprised to find a blooming butterfly weed. We saw a lot of this earlier in the summer, but most of it has already gone to seed this time of year. This is a little Pearl Crescent hanging out enjoying the sweet nectar.
Orange butterfly weed is a favorite for many butterflies. We have it growing in our butterfly garden, and it attracts a large variety of butterflies.

We also came upon this little Red spotted Newt, also called a red eft. The Eastern newts go through 3 stages. They begin as an aquatic larva, similar to a tadpole. Then during their juvenile stage, they leave the water and become a land-dweller. The eft may travel far across land, looking for a new place to live. After two or three years, the eft finds a suitable pond and transforms into the aquatic adult.
We find these guys quite often during our hikes. They are very easy to spot and very slow moving. The kids love to pick them up and carry them around.

We found this guy hanging out on some Black locust near the Milkweed. This unusual looking caterpillar is the larva of the Silver Spotted Skipper. It's interesting that such a large caterpillar would turn into such a small butterfly. These guys hide during the day in leaf tents they build by joining leaves together with silk. The feed mostly at night. They overwinter in their chrysalis and emerge in the spring.


We made it to the milkweed patch, and found only this one monarch caterpillar and a bunch of milkweed bugs. He was already in his final instar, so we went ahead and brought him home. Last night he hung upside down in a "J" and we expect him to form a chrysalis sometime this morning.
Two of our chrysalis turned transparent overnight. We can clearly see the monarch butterflies inside. So we expect them to be emerging this morning as well and we'll be able to release them this afternoon.

i love these afternoon hikes. There is always something new to explore, or a new bug or flower to identify. Nature makes such a fabulous classroom.