Showing posts with label recipes. Show all posts

Monday, March 11, 2019

Cooking with Cave Tools (Sponsored).


i've been a bit obsessed with baking bread this winter. It was one of my goals for the year, to learn to bake homemade bread. i'd like to eventually start making sourdough, but so far i've just been making tradition bread and spicing the recipes up a bit by adding different things.

One thing about bread making that i've learned is important is knowing when the bake is done.  i'm not really experience enough to know just by sight. You can tap the bottom and the bread should sound hollow but i've found by experience that isn't always a sure sign that it's done.  If uncooked the bread with be dense and doughy inside, if over baked it may burn and will be too dry.  i have read that being slightly over baked is better than being unbaked, but i'd still like to learn the perfect bake.  Most breads are done at around 190 f, but this one is a whole wheat  sprouted seed loaf. The moisture from the sprouted seeds required a little cooking time. 


Having a digital thermometer to check the internal temp is really helpful. This one is by Cave Tools, a company that creates high quality barbecue and cooking tools that lasted for years.  The instant read digital thermometer is perfect for cooking food on the grill or in the kitchen. The 100% stainless steel design is waterproof, shatterproof and even re-calibratable for best accuracy. This digital thermometer can be used on meats, casseroles, liquids, deep fryers, candy etc.  Since i was testing out this thermometer, i tried it out on several different things.


i have a non-digital candy thermometer that usually use when making my cheese.  i tried calibrating a few weeks ago, because i suspected that it was off.  This time i used the digital thermometer, and i was right about the candy one being off!  This one is so much easier to use. It doesn't have to sit in the pot to register them the temperature. It's instant read. So it only take a second to get the temp, which can be crucial with cheese making and candy making. If your off by a few degrees it can be the difference between perfection and a failed batch. 


My mozzarella turned out perfect.  Being able to check the temperature and get an instant read is really important during the cheese making process.  


One more test for the Digital thermometer is candy making. i love to make candy, but every time i think i have it mastered i get a failed batch. i'm now realizing this is because my candy thermometer was so off.  i made a batch of honey taffy (i'll spot the recipe in a different post) and it came out so good!!  It's really easy to make and having a good instant read digital thermometer makes all the difference! 


i really love the way the honey taffy came out, and am looking forward to experimenting with some other honey candy recipes once we pull honey this spring and have lots to work with. i'm eager to make some homemade lemon honey cough drops, and elderberry honey lozenges.

If you do a lot of grilling outside or just love cooking, Cave tools has something for you! They specialize in high quality, stainless steel tools, but also have salad spinners, instant read thermometers, silicone grilling mitts and much more. 

You can check out their full line of products at Cavetools.com or on Amazon

i'll post the recipes for all of these later this week!


disclaimer. i did not receive compensation for this post, however i did receive a free product to review in exchange for my opinion. My opinions are my own and are not influenced in any way. This post may contain affiliate links.

Monday, May 29, 2017

Homemade Maple Almond Granola- recipe

i had no idea that making  granola was so easy and that it is so good!!  While reviewing the Big Tree Maple syrup earlier this week, i played around with a few different recipes. This granola turned out so good, i wanted to share it too.  


All the measurement in this are approximate. The only thing i actually measured was the oats. After that i just sort of threw stuff in, you can add more or less to taste. 


Homemade Maple Almond Granola

Ingredients

3 cups old-fashioned rolled oats
1 cup  unsweetened shredded or flaked coconut
1 cup almonds
1/8- 1/4 cup hemp hearts
3 tbsp flax seeds and/or chia seeds
2 tablespoons  olive oil
1/2 teaspoon coarse salt
1/2 cup Big Tree Maple maple syrup
1  cups dried fruit.  Dice it first if it's in big pieces.  i used raisins, cranberries and figs.

1 large egg white (optional) This will help stick it together to make big clumps of granola.

Mix all ingredients in a large bowl except the dried fruit and egg white.  Stir until everything is mixed well.  If using the egg white,  beat until frothy and fold that in so everything is coated.

Place the granola on a greased jelly roll pan or a pan lined with parchment paper. Spread it out into an even layer and bake at 300 for around 45 min. Checking once about half way through to flip the granola using a spatula. When granola is evenly browned and dried out. Remove from oven and let cool before adding in the dried fruit. It keeps up to 2 weeks if kept in an airtight container at room temperature. i keep mine in mason jars.

Don't forget to enter to win a 15oz bottle of Big Tree Maple syrup here! 

* i receieved a complimentary sample of Big Tree Maple in exchange for my review.

Saturday, October 15, 2016

Crust-less Mini Quiche with freshly ground salt and pepper - Spice mill review


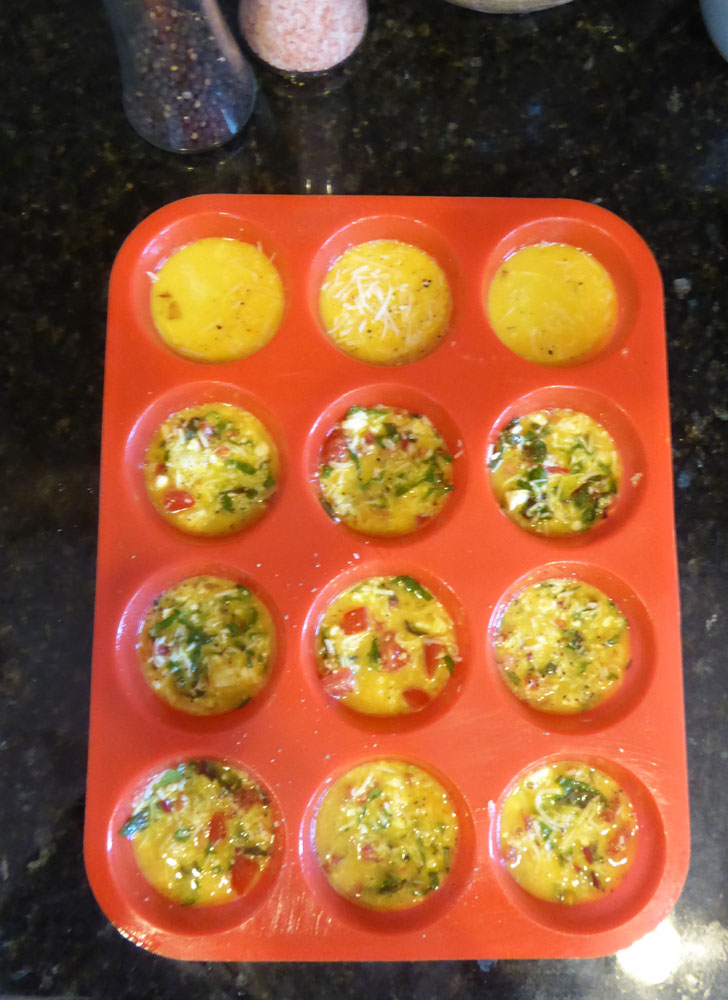
Mini-quiche are my new favorite thing. They are so easy to make and delicious. If you have a silicone cupcake pan, they don't stick AT ALL! So clean up is super easy.  


i intended to take pictures of all the steps in the process, but totally failed to do it, but i had already taken a few pictures of my mini-quiche so i thought i could still put together a post. They truly are so easy you don't need the step by step pictures.  The main ingredients you need for these are eggs, cream or milk, cheese, seasoning, a muffin pan and whatever else you want to add.


Lightly spray your muffin pan with oil. Then in a medium size bowl, use a fork to mix your eggs and cream.  Then stir in the cheese and other ingredients. i used a measuring cup to fill each cavity with the egg mixture, then seasoned it with freshly ground salt and pepper.  
My new salt and pepper grinders are by #Dailykitchen.  They are really nice large glass spice mill shakers with the grinders built into the lid. The stainless steel matches my appliances, and they are so easy to use. My mom is going to be thrilled, it's been almost 4 years since our housefire, and i finally have salt and pepper shakers again.  :) lol.  


Once your cups are filled, bake at 350 for approx. 20 minutes. Check with a toothpick in center to make sure they are done.


Let them cool slightly, then pop them out. they are so good.


Spinach mushroom mini-quiche


4 eggs Large eggs
1/2  shredded mozzarella 
1/2 cup feta
A little olive oil (for cooking the mushrooms) 
1 cup fresh spinach 
1/2 - 1 cup chopped mushrooms
1 medium tomato diced (optional)
1-2 Tbsp, heavy cream or milk
fresh basil shredded (optional)
Freshly ground Salt and Pepper, to taste


heat the oil in a skillet, and add sliced mushrooms and cook until tender 4-5 min. Add fresh spinach and cook until wilted. Remove from heat and set aside. In a medium mixing bowl, whisk the eggs and cream until combined. Add the cooked mushroom/ spinach mixture, the cheeses, fresh tomato and basil/ Mix well. Use a measureing cup to scoop mixture into lightly oiled silicone muffin pan. Add freshly ground salt and pepper to taste. 
Bake for at 350 for around 20 min. or until tooth pick stuck in center comes out clean. 
Recipe makes 12 mini-quiche.


*i received the Spice Mill salt and pepper shakers in exchange for my honest review. i was not compensated. i felt that incorporating them into a recipe and showing them in use was the best way to test them out for my review. i'm very pleased with these shakers, and really love they way they match my kitchen. i was not compensated for this post.

Sunday, September 11, 2016

Chocolate Zucchini cake

Zucchini season is here, so we have an abundance of zucchini and are always looking for creative ways to use it up. This chocolate cake is so easy to make, and it's moist and delicious.


Mix all of the dry ingredients together, then add the oil and vanilla. Mix well and fold in the zucchini, chocolate chips and pecans. It will look a little crumbly, but let it set a few minutes for the liquid from the zucchini to moisten the mixture. Add 1 tbsp water, and mix well.  


The batter should be very thick, but not dry. You can add a little more water if your batter seems too dry. i've only ever had to add 1 tbsp, but i suppose it depends on how much liquid is in your zucchini.
Pour into prepared pans and bake at 350 for 25-30 minutes until a toothpick poked into the center comes out clean.  Let the cake cool and then frost and decorate as desired. 


We devoured this cake and i failed to get a picture of it completed, but thought i'd at least get a picture of the last piece! i will be making this again soon.

INGREDIENTS:

for the cake

  • 2 cups all-purpose flour
  • 1/2 cup cocoa powder
  • 1 1/2 teaspoons baking soda
  • 1 teaspoon salt
  • 1/2 cup vegetable oil
  • 1 1/2 cups sugar
  • 2 teaspoons vanilla extract
  • 2 cups shredded zucchini is)
  • 1 tablespoons water
  • 1/2 cup chopped pecans or walnuts (optional)
  • 1/2 cup chocolate chips (optional)

FOR THE Buttercream FROSTING:

  • 1 cup unsalted Butter, softened 
  • 4 cups Powdered Sugar 
  • ¾ cup of Cocoa Powder
  •  2-3 teaspoons of vanilla
  •  1-2 tablespoons of milk

Directions

  1. Preheat oven to 350°F. Line 2 round 9"  baking pans with foil and spray with cooking spray. Set aside.
  2. In a medium bowl, whisk together flour, cocoa, baking soda, sugar and salt. 
  3. Stir in the oil and vanilla until moistened. Fold in the zucchini. Let the mixture sit for a few minutes so the batter can absorb the moisture from the zucchini. Then, if your mixture is still dry you can add a little more water.  The batter should be very thick but shouldn't be powdery. Add nuts and chocolate chips, if desired.  Spread in prepared pans.
  4. Bake 25-30 minutes until the cake springs back when gently touched.  Cool completely.
  5. To make the frosting: Combine powdered sugar and cocoa powder. Add butter and vanilla. mix until smooth.  Add milk slowly to get desired consistency.

    So easy and delicious! Enjoy!

Sunday, June 12, 2016

What to do with Garlic Scapes? Pesto recipe.


It's garlic scape season!! What's a garlic scape? Garlic scapes are the flower bud of the garlic plant. The bud is removed to encourage the bulbs to thicken up.  Scapes taste just like mild garlic. They can be used in exactly the same way as garlic in any recipe.


When scapes first appear they are curled.  i pick them at this stage, if you wait too long they uncurl and flower. They are too tough to pick at that point and are not good to eat. Every year i let a couple of my garlic plants flower and go to seed, so i have several patches of garlic i grow primarily just for the scapes.  when you grow garlic from seed or bulbils it takes several years for the garlic to be large enough to harvest. So i just harvest the scapes, the first couple years until the garlic is larger enough to harvest.


So what can you do with garlic scapes? The easiest thing is just to saute them in butter or olive oil. i also have asparagus ready to harvest, so i often saute them together into a stirfry. Sometimes i add broccoli or sugar snaps if i have any ready to pick.


Garlic scapes are also fabulous on pizza!! i saute them first, then add them with the other toppings and bake.  So delicious. 


Just like asparagus, scapes are great with eggs. i like to use them in quiche, frittatas, and omelets. i always cook them first, sauteing until tender before adding them to the dish. 


This year i have such a great scape harvest that i decided to make garlic scape pesto. It's incredibly easy to make and absolutely delicious!  i then used the pesto as sauce on pizza topped with homemade mozzarella, feta, asparagus, spinach and more garlic scapes.

i also use the pesto on cheese ravioli and fettuccine.

  1. For the pesto
    • around 10 large garlic scapes (small handful)
    • 1/3 cup pine nuts
    • 1/3 cup finely grated Parmesan cheese 
    •  salt and black pepper
    • 1/3 cup extra-virgin olive oil
  2. Chop the garlic scapes, then add all ingredients except salt and pepper to your food processor or blender.  Blend/process until smooth, then season with salt and pepper to taste.  
Can be refrigerated for up to a week. 

Garlic scape pesto is so good on pasta! Do you have a favorite way to eat garlic scapes?  Let me know in the comments! 


Friday, April 3, 2015

No-bake bird nest cookies


No Bake Bird Nest cookies
2 Cups Sugar
1 stick butter
1/2tsp vanilla
1/2 cup peanut butter
1/2 cup cocoa
1/2 cup milk
3 cups oats

coconut
green food coloring(optional)
jelly beans or chocolate egg candies.

Place about 1 cup of coconut in a bowl and add a few drops of green food coloring. Use a fork to stir it until all the coconut is green.

Mix sugar, cocoa, butter and milk. Boil for 3 min. Remove from heat. Add vanilla, peanut butter and oats. Coat well, and drop by rounded tablespoon on tin foil/waxed paper. Press spoon into center of cookie to give it a nest shape. Then place a big pinch of the coconut in the center of each cookie and decorate with jelly beans/candy.

Enjoy!

Friday, September 5, 2014

Summer Garden Meals


There is something magical about planting a tiny seed in the ground and watching it turn into a plant that produces food to feed the family.  Often times a garden just supplements what we buy from the grocery store, so it is always extra rewarding when we can create a meal that was entirely (almost entirely) grown at home.  Here are some of my favorites from this summer.

i rarely use recipes, i just sort of throw things together without measuring anything. So i'll give you a description of each meal, link to the recipe if i've posted one or link to a similar recipe if i haven't for those of you that prefer recipes with exact amounts.


1. Raw zucchini noodles with pesto and fresh tomato

This makes a really great light lunch.  i used a carrot peeler to create raw zucchini noodles, you can also use a veggie spiraler. Mix the noodles with a bit of homemade pesto.  i topped it with fresh diced tomatoes and a sprinkle of parmesan and pine nuts. If you don't have pesto, an alternative to this recipe is to dice a fresh tomato, add diced garlic and shredded basil then drizzle olive oil over it. Mix well and and top the raw zucchini noodles with it. Then add a sprinkle of feta or homemade goat cheese if you have some or leave the cheese off if you prefer.


2. Garden Veggie Frittata and Mock apple pie.

Click on the links above for the recipes. Our chickens provide us with lots of fresh eggs, so i love recipes that use garden produce and eggs.  You can make your frittata using many different garden veggies. In the spring i like to make them with spinach, swiss chard, morel mushrooms and asparagus, while summer frittatas tend to have lots of squash and tomatoes in them. You can create them with what ever garden veggies you have on hand.  The mock apple pie, doesn't fit as an entirely homegrown meal, but it was in my frittata picture so i included it anyway.It's always a good recipe for using up those giant zucchini.


3. Sauteed squash with onion, garlic and cherry tomatoes.  This is a simple and delicious meal. i included a similar recipe. All i do is heat up some olive oil and add diced garlic, sliced summer squash and zucchini . Saute about 5min-10min. you want your squash to be tender crisp, not soft and slimy. Add some shredded basil and cherry or grape tomatoes and heat another minute or two so the tomatoes are heated through. Then sprinkle with goat cheese, feta or parmesan if you like. Salt and pepper to taste.


4. Bruschetta topped with heirloom tomatoes and goat cheese.  Here is an official recipe for bruschetta if you need one.  All i do is take some sliced french bread, brush with olive oil and put under the broiler until it's lightly toasted on both sides.  You really have to watch it, it browns quickly. For the topping dice a couple tomatoes and place in a bowl. Add minced garlic and a handful of shredded basil leaves. Drizzle with olive oil and let sit a few minutes while the bread is toasting. Then spoon the tomato mix onto the bread and sprinkle with goat cheese, feta or whatever you like. Place under the broiler again, and heat just another minute or two being careful not to let the bread get too brown.


5. Garden Veggie Hash  This is favorite with breakfast dinner. Multi colored potatoes, peppers, squash, onion and garlic pan fried in a cast iron skillet and seasoned with salt and pepper. We usually serve it with scrambled eggs or omelets.


6. Rainbow Veggie Bake 

This is both beautiful and delicious.  All you do is dice onion and garlic, cook in olive oil till soft then pour in a 8x8 casserole or glass pie pan. Make sure the bottom of the dish is covered well with the oil mix. Then slice potatoes, squash and tomatoes and place them in the dish like this. add salt pepper, rosemary, italian seasoning etc. Drizzle with olive oil cover with tin foil and bake 30 min. remove foil, sprinkle with parmesan and italian cheese and bake another 15-20min. until potatoes are tender.  i used purple and red potatoes, zucchini and yellow squash, pink, yellow and purple tomatoes to give it lots of color.


 You can layer your veggies in a spiral in a round baking dish/pie pan or make rows in a square 8x8 casserole dish.  Both have a beautiful presentation and taste fabulous either way.


7. Ratatouille  This is a perfect fresh garden meal. Everything came from the garden except the olive oil, salt and pepper.  If you follow the link there is a recipe for ratatouille. When i make it i don't measure anything, i just chop a bunch of veggies and throw them all together.


8. Caprese salad with balsamic vinegar reduction
This is another really easy and delicious meal.  All that is in this is fresh tomatoes, fresh basil leaves, mozzarella cheese and balsamic vinegar. If you want to use fresh mozzarella you can learn how to make it here.   For the balsamic vinegar reduction i used about 1/2 cup vinegar, and simmered it on med heat until it had reduced to about 2 tbsp and was thick, but still pourable. You can add a little honey if you prefer it sweeter. Let it cool while you slice the tomatoes.
.
 i used pink, purple and yellow tomatoes because i love color.  Slice your tomatoes and mozzarella cheese into 1/4" slices and  arrange them on your plate by alternate between the different colors and the mozzarella cheese, like above. Then add a handful of shredded basil, salt and peppers and drizzle the balsamic vinegar reduction over the top. Serve immediately.

These were just a few of my favorite garden recipes this summer. i hope you enjoy them!

Thursday, August 7, 2014

Pickles by the Pint.

This year my cucumbers did absolutely horrible. The plants were attacked by both squash bugs and cucumber beetles before they ever really had a chance to get going. i had to pull many of my plants, but i had a few hang on and produce a few small cucumbers. Although i was picking a cucumber here and there, most of them were really small and deformed and i knew i would never gather up enough for a batch of pickles. 

The recipe i use for refrigerator pickles makes one gallon of pickles. In the past i broke the recipe down to quarts, since i didn't have any gallon jars. i also didn't have room in my fridge for 4 quarts, so i would make two at a time.  Since i was only getting a few cucumbers at a time this year, i decided to break the recipe down into pints.  

i found it's incredibly quick and easy to make one pint of pickles. Refrigerator pickles can last up to two months in the fridge, and because they are not canned/processed you don't have to sterilize the jars.  Just wash in hot soapy water, rinse well and you are ready to go.


Ingredients

cucumbers (i used two small)
1/2 Tbsp dill seed, small dill head or a small bunch of dill weed.
1/2 Tbsp whole peppercorns
1 whole clove garlic (peeled)
3/4 cup water
1/4 cup + 2 Tbs vinegar
1 Tbs pickling salt
1 tsp sugar (optional)


Peel garlic and place 1 clove in bottom of pint jar, add dill and peppercorns. Wash cucumbers and cut in slices or spears.  Pack into pint jar.


Combine water, vinegar, sugar (if using) and pickling salt in a non-corrosive pot and heat until boiling. Microwave works well too and only takes about 2 min. ;) 

Now pour hot brine over cucumbers leaving about 1/4-1/2 headspace. It's okay if you don't use all the brine.  Let cool completely, and then put the lid on and tighten ring. 


That's it.  Place in fridge and allow them to 'pickle' for one week before opening for the best flavor. i always taste them after a day or two, and keep nibbling and by the time the week is up most of the pickles are gone. :) So it really just depends on the flavor you're looking for.  They get stronger with age and will last up to 2 months in the fridge.  i've been playing around with the dill using a combination of seeds and dill weed. The different parts of the dill plant each offer a slightly different flavor. 

So far i've only managed to pick enough cucumbers for 3 pints.  i have new plants coming up and am hoping that i end up with a few more cucumbers before the fall.  i was disappointed that my plants did so poorly, but still grateful to get enough cucumbers for a few pints of pickles in my fridge. 

Thursday, July 24, 2014

Super Easy Tasty Blackberry Cobbler

 This year there has been an abundance of berries! The blueberries, black raspberries and blackberries have all done really well.. Although my red raspberries did very little, they are everbearing so there is a good chance i'll get some this fall.  The blackberries however, are still going strong! i've been picking a couple quarts each day. 


This blackberry cane came up wild in between the blueberries. Earlier this spring i had asked the husband to move it, because i really didn't want it competing with the blueberries.  He didn't get around to moving it right away, and once it flowered i told him just to leave it until the fall because i knew it was going to be loaded in berries.  i was right, this one cane has provided us with at least 8 quarts of berries and it's still producing! i have several other really nice blackberry patches this year, and have made jam, cobbler, blackberry banana bread and frozen at least a gallon.  Living her for 14 years i am still always amazed by the abundance of the land. 

We recently went to a family reunion and i needed a dish to take. Since we were traveling 5+ hours in the car i wanted something easy that would travel well. Since we'd been blessed with so many blackberries i decided to make a cobbler. There are tons of Cobbler recipes out there, but i wanted something really simple.  This recipe is perfect. Super simple, and delicious. 


Step one, Preheat oven to 375.  Wash 4 cups of blackberries and place them in a greased/ buttered baking dish. i used a 2 quart decorative baking dish, but an 8 x8 casserole pan would work well too.  Sprinkle 1 tbsp of lemon juice over the blackberries and set aside. 


Step 2.  In a large bowl, mix 1 cup flour, 1 cups sugar and 1 egg.


 Using a fork, mix until it turns to a coarse meal.


It should look like this. Easy right? 


Now dump it on top of your berries. Melt 6 tbsp of butter in a small dish and then spoon it over the top making sure to cover as much of the crumbles as you can. 

Bake for 35 minutes or until the top is lightly browned and bubbly. 


Here is the recipe recap.

Ingredients
  • 4 cups fresh blackberries
  • 1 tablespoon lemon juice
  • 1 large egg
  • 1 cup sugar
  • 1 cup all-purpose flour
  • 6 tablespoons butter, melted
Preparation
Preheat oven to 375°. Place blackberries in a lightly greased 8-inch square baking dish; sprinkle with lemon juice. Stir together egg, sugar, and flour in a medium bowl until mixture resembles coarse meal. Sprinkle over fruit. Drizzle melted butter over topping. Bake at 375° for 35 minutes or until lightly browned and bubbly. Let stand 10 minutes

Serve with vanilla ice cream or whipped cream. Yum!

This is my new go to cobbler recipe. i haven't tried it with other fruits, but as long as the fruit is juicy i think it would work well with most fruits. It doesn't have the biscuity/bready topping like some cobblers i've tried.  However the crumble top is delicious, and some of it sinks down into the cobbler creating a cakey center.  It really is fabulous! 

* i found this recipe on My recipes. You can view the original here. 

Thursday, October 24, 2013

Bread Bowls


This is an old post from several years ago. i decided make bread bowls today and since my pictures in the RV didn't come out that well i thought i'd just copy the old blog post.

 i've played with a couple different bread bowl recipes, and this is my favorite.   They are very easy, yummy and hold soup well.  They are not your traditional bread bowls that have to be hollowed out, they are literally a bowl made of bread. 

Bread Bowls

*Ingredients:*
1 cup warm water (from tap)
1 package active dry yeast
1 TBSP sugar
a pinch of salt
2-3 tablespoons vegetable oil (i use olive oil)
2 1/2 to 2 3/4 cups flour (i do half whole wheat/half white flour)
4-6 small pyrex bowls. You can use 6oz custard cups or the 8oz size

preheat oven to 385

Measure water into large bowl; sprinkle in yeast and stir until dissolved. Add sugar and let sit a few minutes, until frothy. Add oil, salt and 1 cup white flour; beat until smooth. Add 1 cup whole wheat flour. Mix well, begin to knead and add enough additional flour to make stiff dough. i usually add 1/4-1/2 cup white flour. Knead well for a couple min, and then slowly add more WW flour until dough is soft, but no longer sticky and is smooth and elasticy, 5-10 min. Set aside and let rest.


Grease outside of 6 pyrex bowls (pan spray works well). i like the little custard size bowls. i think they are 6 oz. You can use the bigger 8 oz bowls, you'll make 4 large bowls instead.

Punch dough down; divide into 4-6 pieces. Spread each piece into a circle about 6 inches in diameter. Place over outside of bowl, working dough with hands until it fits. Set bowls, dough side up, on greased baking sheet. Let them set for a couple min. they'll rise just slightly.


Then bake them about 8min. Use an oven mitt to flip bread bowls right side up ( They're HOT!) and remove the pyrex dish.


Now bake them right side up an addition 8 min. until they are golden brown. In the pictures, i use 3 of the small glass bowls, and two of the larger size. Fill with a thick soup and enjoy!!


Broccoli cheese,veggie chili and corn chowder are our favorite soups to eat in a bread bowl.