Friday, April 27, 2018

Adventures in Beekeeping. We have bees!

We've been anticipating this day for quite a while, but we finally got our bees! The weather has not been cooperating, and so the date kept getting pushed back. This has been the coldest April we've ever experienced here. With snow showers several times the first 2 weeks.  All the flowers are about 2 weeks behind, so that pushed everything back two weeks. 


Kenan is both excited and nervous. Beekeeping is a pretty large investment, and the strange weather has made it feel like a bit of a gamble. Last year many very experienced beekeepers lost almost all of their hives. For first time bee keepers it's not unusual to lose a hive a two the first year. If the weather isn't cooperating the loss could be even higher. 


To keep the bees passive they've been sprayed with a sugar syrup solution. They are so busy sucking up the sweet treat, they become docile and kind of 'sugar drunk'  and so they don't attack.


When it warmed up we added our bees to the hive. Bee behavior is affected by temperature. They rarely work when the temperature is below 57 F or above 100 F. They cannot fly when the temperature is below 55 F.   So we wanted to wait until it was warmer to add the bees. First thing is to remove the feed can. 


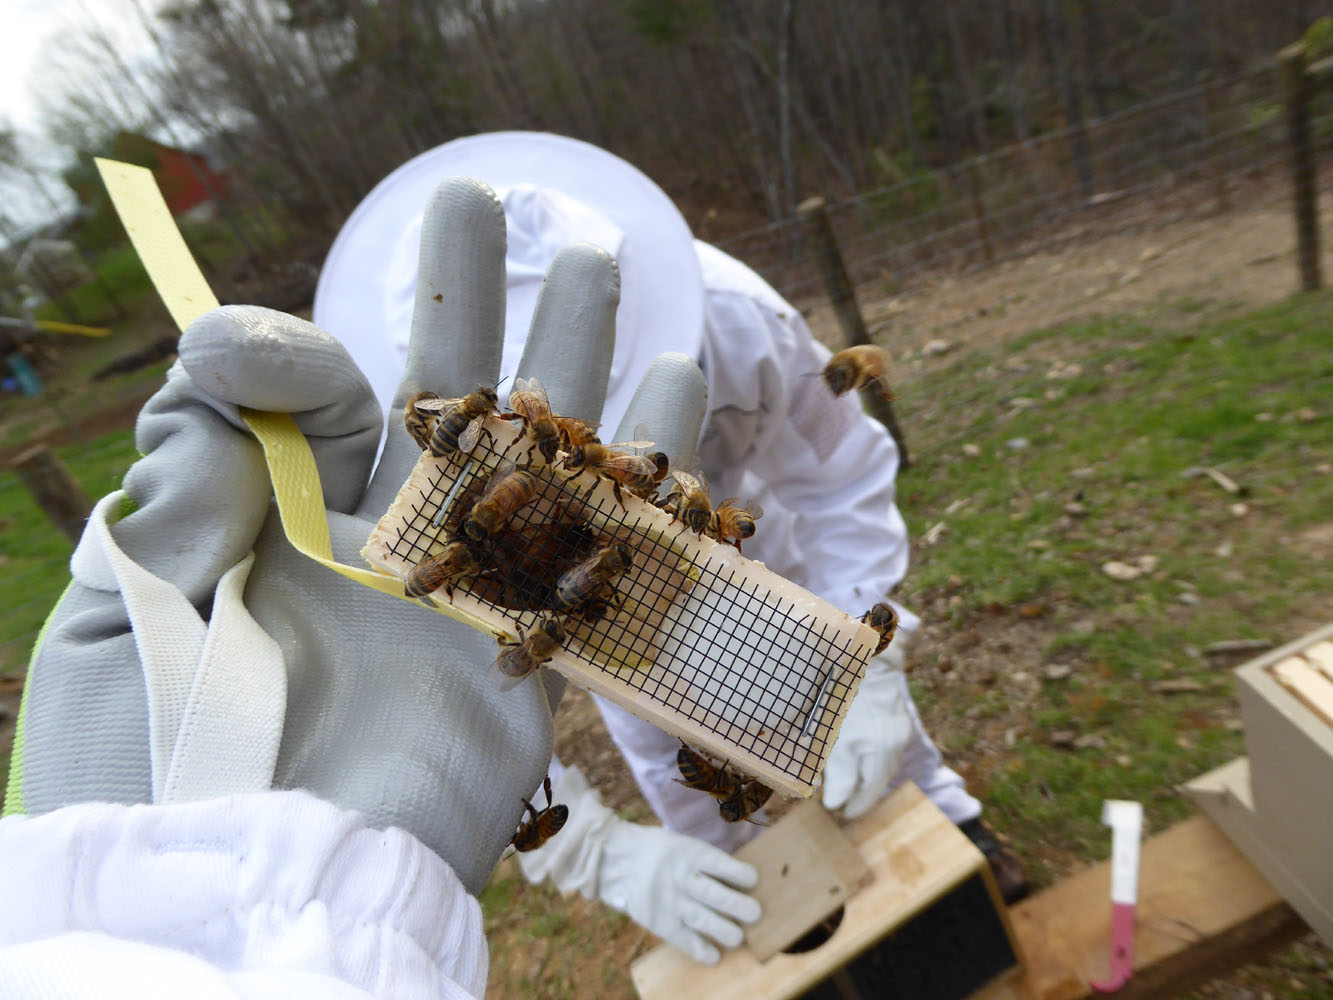
Next you remove the queen cage and make sure she's alive. The queen has to be separated from the hive until they get use to her and accept her scent. There is a 'candy' plug at one end of the queen box. It should only take the worker bees a couple days to eat through the plug and release the queen. 


Once the feeder can has been removed and the queen is set aside you remove a few frames from the center of the hive and literally dump the bees in. Once the bees are in the box you replace the frames and place the queen box on top of them. Then you close up the hive box and hope the bees release and accept her. We checked our queen cages after 2 days and 3 out of the 4 queens had been released (we have 4 hives). So today we'll check the remaining queen to make sure she is out. If not, we'll have to remove the plug and manually release her and hope that she is accepted into the hive. 


We had a few hiccups with the top bar feeders we used in two of the hives, and switched to canning jar feeders.  It looks like all four hives are doing well now though We had a couple days of cool wet weather right after we installed them, but yesterday it finally warmed up and they were flying in and out and very active.


We may or may not get any honey the first year. It's all a learning process at this point, and we are really just hoping our bees survive. We hope to see an increase in the pollination our gardens and fruit trees and eventually we look forward to harvesting honey, pollen and honeycomb. 

We purchased our bee boxes from Brushy Mountain Bee Farm and our bee suits from Humble Bee US.  The bees were ordered through the local bee association.  If you are interested in keeping bees i would recommend taking a bee class and connecting with your local bee association. Although raising bees isn't difficult, there is a lot of information to learn. It's definitely the kind of thing you want to research before jumping into it. We'll be sharing our beekeeping journey on the blog, as well as the many other projects we have going on this year. 


Monday, April 9, 2018

Spring Break 2018 TN road Trip- Gatlinburg

This year didn't really make any plans for spring break. The kids Spring Break is kind of lame anyhow. They get Friday and Monday off, giving them 4 days, not even a full week. So it really isn't enough time to take a vacation.  In the past we've taken extra days off of school and gone down to Florida to visit my folks, but they already headed back to MI. So that wasn't really an option.

We had started looking into day trips and found a group of waterfall that were in close proximity in Gaitlinburg TN. i had always wanted to go to Gaitlinburg,   so we decided last minute to drive to TN. Kenan had printed up a few maps, and programed the gps into his phone so we headed on our way. Since it was pretty spontanious and the trip took a bit longer than we expected, so we didn't get to Gaitlinburg until around 3pm.  We had no cell connection, so the gps wasn't working and we couldn't find the road that was on our printed map. So we got a bit lost, and then ended up pulling over in a spot where lots of other cars had pulled over. 


We got out of the car to walk around and found that we were at the Historic Noah ' Bud' Ogle Farm


The terrian is extremely rocky, and it was neat to see the way the barn and house were built around the rocks. It's hard to imagine anyone farming here, but the Ogle's grew corn and had an apple orchard. The also had a tub mill along the LeConte Creek.


Ogle's cabin and outbuildings were built in the late 1880s and early 1890s. It's pretty amazing that they are still standing, especially since last years wild fires, came right through this area.


This is the last of at least 13 tub mills once located along LeConte Creek. The hollowed-log flume had very recently been replaced. Not sure if it had been burned in the fire, or just deteriorated from age.


Only a few yards from the house was an area that had been burned in the fires.  It was crazy how close it was and yet the house and barn were left untouched.  We saw many trees that had been scorched and others that were untouched. 


We hadn't really thought about the fires that had completely devasted this area last year, when we hoped in the car and headed this way, but our first stop was in an area that was hit pretty hard. After hiking through the burned area, we got back in the car and went looking for our first waterfall. That's when we really started to notice all the newly constructed buildings, and burned areas.  We continued on to the first waterfall on our list, but the found the roads were still closed for the season. 


This first waterfall we came upon was Meigs fall. It looked much more impressive online.  It's veiwable from a pull off along Little River Rd, but isn't marked and is incredibly easy to miss. The only reason we found it was because there was a couple doing their wedding shoot on the road in front of it.  i guess we are a little spoiled by the waterfalls here in Virginia, because this one was really pretty disappointing and nothing great.  


We had actually drove right by The Sinks, and had to go back to find it.  This one is listed in the top 5 falls in Gaitlinburg and again we were really not impressed. It can be access from the road, so if you've never seen a waterfall and are unable to hike, then i can see it being recommended.  

We had several other falls we wanted to check out, but with roads still being closed for the season and the extra time it took us to get around gaitlinburg we ran out of time. We ended up heading on to Knoxville to get a hotel and spend a day there visiting the zoo and Botanical Gardens.

i thought i'd enjoy Gatlinburg more than i did, but honestly once we left the actual town it looked exactly like here. The road we were on looked so much like Indian Creek here, i kept forgetting we were in TN. We did see bear and wild turkeys while driving around, but again i see those here at home on a pretty regular basis. :)  i would like to go back and check out the town sometime, but it looked crowded and expensive and i'm not sure how much i'd actually enjoy that either.  i did at least get to check Gatlinburg off my bucket list even if we really just drove through. 

Monday, March 26, 2018

Reducing plastic with Sunsella Stainless Steel Water Bottle #noplastic #sponsored


In my ever constant struggle to get rid of plastic, we've been slowly replacing our water bottles with stainless steel. This Vacuum Insulated Stainless Steel Water Bottle by #sunsella holds 17 oz and comes with a carrier clip


It has a leak proof screw on lid and keeps drinks hot or cold for up to 24 hours. It's made with highest quality food grade 18/8 Stainless Steel. It will not sweat and is rust free. It has a removable silicone ring with Aluminum carabiner so you can clip it onto your backpack, tote or handbag.  It comes in light blue, polished stainless and rose colors


This is a nice bottle, i really like the color and size. It's not too heavy when filled. The mouth is narrow, but i can still fit the ice cubes from the ice maker in it. Double walled means it doesn't get to cold to hold!

.

i love the modern shape of this water bottle. My girl has claimed this one (although i may end up borrowing it) and wanted me to customize it with a vinyl decal. i recently got a Silhouette Cameo and have been adding decals to everything!! i'll share a post soon with some of my recent projects.


She picked up a neat wolf scene and i have it cut and ready to apply. This bottle shape is great for this decal. If you like customizing water bottles, this one is perfect!


The finished decal. i relly think it turned out great, and my daughter is in love with the bottle. The shape, the color...she's been using it non-stop since we got it.  i'm thrilled to be able to get rid of some of the plastic water bottles we still have by replacing them with stainless steel.

You can find this Sunsella water bottle on amazon here! http://www.amazon.com/gp/product/B075SWTGZX 

You can also visit www.sunsella.com to check out their other products!

#waterbottle #noplastic #stainlesssteel #sponsored #freeforreview #referral #stayhydrated

Happy Spring!! March snowstorm 2018


Spring is my favorite time year. i love everything about it. The budding the trees, the flowers pusjhing up from the ground, my hens laying again and the promise of new life. This spring however, we've been blessed with snow. Lots and lots of snow. 18.5 inches to be exact!! We've had more snow this spring, than we had all winter.


Every year i get a picture of snow on my daffodils, so i really wasn't that suprised that it snowed.  i'm just suprised by the amount! i'm hoping this is winter's last big storm and spring will wake up soon. 


Wake up spring!!  You've slept in!!  


It's definitely beautiful though. Like a winter wonderland...but in the spring.


The snow was so heavy that trees have been snapping and power is out for much of our county. We lost power on Saturday night and it isn't expected to be back on until Wed. at 11:59pm. 


We have a woodstove and plenty of wood to keep us warm.


We've putting together puzzles and finally gave in and started up the generater to charge our devices, run the fridge and even watched a movie last night. Although i'm super ready for spring, i'm enjoying this time to slow down, to sit together as a family working on a puzzle or just sharing space together by the wood stove. 

Thursday, February 22, 2018

Homemade Yogurt using freeze dried cultures from Natural Probiotic Selection *Sponsored


Ever since we started our cow share over 2 years ago, i've really enjoyed making homemade cheese. We only get one gallon per week, but none of us are big milk drinkers and occasionally we get behind with our milk and have extra. So i usually make a batch of  mozzarella and ricotta about once a month. This week they switched up our pick up days, and i only had an extra quart. Not really enough to make cheese, so i decided to try making homemade yogurt. 


i used freeze dried cultures from Natural Probiotic Selection.   Each yogurt culture packet contains five freeze dried cultures, including streptococcus thermophilus, l Bulgaricus and bifidobacterium spp. Since the yogurt contains active cultures, i can use a few TBSP from this batch to re-culture up to 2 gallons. There are a variety of ways to make yogurt, you can use a yogurt maker, a crockpot or a more traditional method.  i don't have a yogurt maker, so i just did the traditional method.


Start with 1 quart of milk and heat to 149°F.   Remove from heat and allow to cool 30-40 min until the temperature reaches 104- 113 degrees.   Now add the contents of the starter package and mix well. 


Pour the mixture in sterilized jars and incubate at 104°F -113°F with no stirring or shaking.  i used a coffee filter to cover it, so it could breath without getting dust in it. You can use a yogurt makers, but it isn't necessary. i did the more traditional method. In order to keep my jar warm i turned my oven on to the lowest temperature. Then turned it off and let it cool a little then placed my jar inside with the oven light left on. i  was pleasantly surprised how warm it still felt in the morning. You can also wrap it in a thick towel and place it in a warm spot, or use a hot water bottle. It is important to keep the temperature in the 104°F -113°F range.

Using the traditional method, the yogurt need to sit for 24-48 hours without being stirred or shaken.  Once it is set, you can remove 3 TBSP to use as starter for your next batch. Then place your yogurt in the fridge for 3-6 hours to help it firm up. 


The fresh yogurt has a definite tang to it. The longer you let it incubate, the tangier it gets. i added a bit of honey to sweeten it up, and topped it with muesli and frozen berries.  Wow, it was super easy! i'm not sure why i waited so long to try.


How to make Homemade Yogurt using freeze dried cultures.
 Ingredients
Instructions
  1. Heat milk in stock pot to 149 F degrees 
  2. Remove from heat and allow to cool 30-40 min until the temperature reaches 104- 113 degrees
  3. Add contents of starter pkg and stir well.
  4. Pour into sterilized canning jar and allow to incubate in a warm place for 24-48 hours.  It is important to keep the temperature in the 104°F -113°F range.
  5. Check periodically with thermometer (or feel outside of jars) and stir (warm is good but too would kill your active cultures).
  6. Once set, remove 3 tbsp to start your next batch, and then place the jar in your fridge where it will continue to thicken.
  7. Cool completely, If the yogurt is thinner than desired you can then drain the remaining whey using a sieve and coffee filter if desired.  This gives it the thicker consistency of greek yogurt.
  8. Eat plain or add toppings. i like to sweeten mine with raw honey and add fruit and granola.
 These freeze dried cultures can also be used with dairy alternatives to make dairy-free yogurt. My yogurt came out great!  i can't believe how easy it was to make! 


Natural Probiotic Selection also offers cultures for Kefir, Bulgarian yogurt, vegan (juice extracted) cultures, Pure Acidophilus yogurt and more.  Check out the website https://www.yogurtathome.com/home for more information about the different yogurt cultures and methods for making amazing yogurt at home!


*This post was sponsored by Natural Probiotic Selections. i received a free product or compensation in exchange for my review. It also contains affiliate links. i may earn a small commision if you purchase an item using my link.  My opinions are my own.